Tuesday, April 15, 2008

Where the Old God's Played

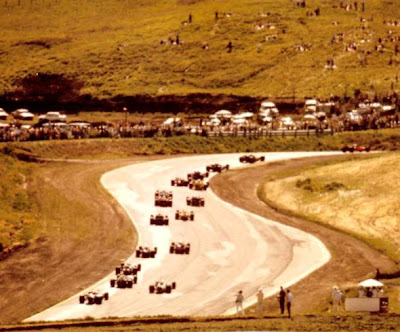
Two things are different at a track like Sears Point (Infineon for those of you under thirty.) The first is that, being an older track, it has little run-off with lots of chances to wad up your car. The second is that, unlike the new club tracks, it is just dripping with history.

To grab the same corners as the new gods have done once a year since ’88 is one thing. Today it’s Stewart, Montoya, and Gordon’s playground. But back in the day there was a race on this track where Dan Gurney held off Mark Donahue and Mario Andretti to take a win in a wingless USAC Indy car. I was in the fifth grade at Seaside elementary school at the time, you, dear reader, may not have been born.

So while there is a lot to say about driving a track with history, nevertheless it is often better to praise the Gods than to visit the Olympian heights. It’s too damn cold up there for me.

An example? Our Mazda GT’s go to Infineon once a year, I first went in 2006, skipped 2007, and returned this year. But both years my very first hot lap of the weekend was a race lap and this time I can’t even blame weather god Freyr, since unlike 2006 the weather was perfect all weekend. No, this time the culprit was mostly my own stupidity.

It was a crowded weekend, with NASA setting an all time record for entries at 455. To make room for all those cars they started off by cutting the morning warm-up to just ten minutes while combining three race groups into one session. Then the race gods smote the qualifying session, a red flag cut it down to the point where I never got up to speed.

(Paul's Qualifying Session)

So by the will of the weather gods or just bad luck, neither year gave me the chance to pick out any marks or really have a clue as to what the car was going to do before the race. It is never a good idea to have your first hot lap be a race lap, and this weekend I proved that in spades.

I got a very good start for the Saturday race and went cleanly through all the way to the carousel right on Aaron’s backside, in third place I believe. I had mixed it up a little bit with Aaron during the shortened qualifying, with both of us being held up by slower cars at various times and degrees, but it seemed that I could take him in the esses, turns eight to ten, if I could stay close enough to him going into turn seven. I also knew that Aaron had the chance to run the non-NASA practice day on Friday and so I planned to use him as a reference for some brake points until I could get by. That is, of course, where the first hot lap being a race lap led me astray. I had no mark of my own for any brake points since this was my first full-tilt boogey drive into these corners in two years and using Aaron’s brake point wasn’t the most brilliant idea I've ever had, and that is saying something.

You see my car is older and I’ve been too cheap to get the new, lighter fiberglass and sundry, so when we weighed the cars at the start of the season it turned out my car was two hundred and thirty pounds heavier than Aaron’s brand new car. I forgot that and well… you do the math.

I was at threshold braking going into turn seven and looking like I was about to rear end Aaron. Obviously I couldn’t turn and he was right on the line for his entry, which blocked my way to the run off. The exit of the carousel, leading onto that straight before seven is uphill and gives the car a bit more stick, but when it flattened out just before the turn in point I started losing the rears. I tried modulating the brake pressure to get them rolling again but couldn’t do what I needed to do, that is, I really needed to let up on the brakes entirely for a split second to get the rears rolling again and let the car overshoot, using the run-off to live another day, but Aaron was just an inch off my nose and still slowing for the corner. The car started a wiggle and as soon as it got a wee bit sideways, both the right front and right rear started blowing enormous plumes of smoke as, against my will, I slowly started to pivot. It was that pivot that kept me from rear ending Aaron.

I was sweating bullets at this point since pretty much the whole field of Mazda GT’s were just a few inches away and I had little control over my car. But just a second or so into the spin I thought I’d clear it, spinning off into the turn seven run off and getting a chance to gather in the car and resume the race at the end of the pack. But the racing gods decided to spend some of their wrath on me. As I let up on the brakes to let the car get farther away from the apex, thinking that the farther from the apex I was the easier I would be to avoid, I felt the thump.

Tom D, who built my car, was right on my tail going into seven and couldn’t duck to the apex; instead, unknown to me he tried to go around my outside and almost made it. In fact, he would have made it if I’d kept the tires locked up. As it was I felt the thump and saw pieces of my rear bumper scatter themselves in front of me. Everybody else got away, with Josh especially making a very fast and fine avoidance maneuver.

Thorpe owes me this win since I managed to scatter the rest of the field so badly that they were unable to catch him. But somehow I doubt if I’ll get a trophy for that. At least not one I would admit to owning.

Later, when inspecting the damage it was clear that Tom’s car was damaged much more than mine was. My rear clip was bent which put me out for the weekend, but Tom lost the drive-train from the driveshaft back and his right rear suspension. If fact, if I wasn't smelling a lot of gas I might have been tempted to continue rather than just driving back to the pits since the car felt a lot better than it looked. That evening Tom had Leroy and Jose take my car’s good rear and put it on his car, so at least one of us could run on Sunday. But I was done.

It was obviously a bit more than just disappointing, but being cursed like I am when I try to muscle my way into the old gods playground, I suppose I should at least be thankful that we both walked away physically unscathed, although it wasn't a very hard hit and our cars are certianly built to take it even if it was.

I didn't hang in for the Sunday race, but from what I hear it was a real barn-burner. One of the best ever, so I'm really looking forward to getting some video going for that one.

Sunday, April 6, 2008

Infineon Track Notes

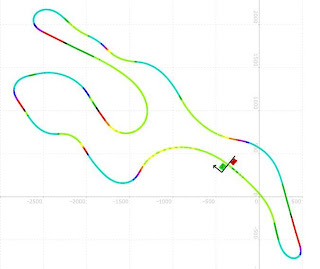
There’s no way I can match Paul’s writing prowess, so I’ll get right to it. Here’s my attempt at some track notes intended to help folks new to Infineon. I haven’t driven this track in the Mazda GT yet, so everything that follows is based on my 2004 BMW M3. The track map to the left shows braking, acceleration, and turning zones as pulled from a Traqmate during a 1:53 lap included in this video. I hope this is helpful and I look forward to seeing everyone next weekend!

Turn 1
The combination of turns 1 and 2 is my favorite of any of the Northern California tracks; it’s sooo hard to get right. Turn 1 is an uphill left with turn in just after the start/finish line on the far right side of the track. Look to apex the pit wall on the left 1 or 2 car widths out and let the car drift back out to the right as the radius decreases. I find neutral throttle a little after turn in, although I hear it can be done flat out, and use the hill to slow the car from 110 to 85 mph. As the car sets through the rather bumpy high speed turn, aim for the burm on the right side at the entrance to 2. When the car is lined up to run parallel to the burm, things get busy. In a very short period of time, you’ll need to tap the brakes, downshift, initiate turn-in for turn 2, and get back on the throttle without upsetting the balance of the car. Turn 2 is the least forgiving turn on the track so mistakes in the very difficult turn 1 will test your car control skills as you crest the hill.


Turn 2
Turn 2 is a blind, over-crest right hand turn. The apex is just out of view from the turn-in point and also crests the hill as the track shifts a little off camber. It’s very easy to spin here if you don’t start to track out before the crest of the hill. As you unwind for the exit, keep a bit of steering angle dialed in to set up for Turn 3 and ease on the power to shift weight to the rear of the car.


Turn 3
With a little power and steering angle as you exit 2, you’ll naturally find a little pocket on the right side of the track that sets you up nicely to turn in for Turn 3. A bit of brakes as you enter the pocket to drop about 5 mph will help the tires set but you can hold a little extra speed into the first turn since camber and uphill compression are in your favor. Look to the end of the burm on the right side of the track and get back on the throttle enough to hold a constant speed through 3a. 3 is a compromise turn where you’re setting up for the very short straight between 3a and 4 so the apex and exit points are at the end of the burm on the left side of the track.


Turn 3a
At the apex/exit of 3, hold the wheel straight for half a beat, then turn in to 3a. This is a downhill blind-exit turn, so the right apex and plenty of power will plant the back end and shoot you down the short straight to the entrance of 4.


Turn 4
After powering down the hill from 3a, you will need to brake heavily for Turn 4. It's a downhill, off-camber turn that leads to turn 5, which is really another straight, so getting it right is important. Look for a late apex that places your exit near the end of the exit burm. When learning the track, I found it very difficult to be disciplined enough to slow properly for the entrance of 4; not doing so will cause the front end to push end prevent you from getting on the power for 5.


Turn 5
Turn 5 can be taken nearly flat-out, unwinding at the exit to use most of the track as you head uphill for 6. I tend to brake a little later than most at the entrance to 6, lining up just right of track center and easing on the brakes after the crest of the hill. There’s a very short period of straight line braking, as traction comes back after the crest, before moving to cautious trailbrake at the entrance to the Carousel. This can make for a scary turn 6 so if my tires are falling off, I’ll often tap the brakes a bit before the crest of the hill to make for a safer entrance.


Turn 6
Turn 6 is a long downhill left-hander that exits to a long straight, so getting this turn right is critical. The apex is at the bottom of the hill, just past the end of the burm, and is out of view. Use throttle steering to bring the car slowly in for the apex, but not too slowly since camber drops off at track center near the bottom of the hill. Setting up for a tight line at the bottom will allow for lots of throttle as you aim for the apex and begin to unwind.


Turn 7
Turn 7 is one of the 4 places on the track where you’ll be slowing from ~110 mph. It’s also the second hardest braking point, behind the entrance to turn 11. You can take a couple lines through 7, depending on the circumstance. A wide entrance from the far left with a late apex at the second burm will allow you to get back on the power sooner but it also leaves the door wide open for a late-brake pass. As an alternative, you can double apex the turn with a healthy amount of trailbrake at the entrance. In either case, you’ll be looking for a late apex at the second burm to get a good run through the esses.


Turns 8 and 8a
The esses leading to 8a are a series of compromise turns where you’re really looking to set up for a good run through 9. The hardest part about this series is maintaining the patience necessary to sacrifice it. Keep a neutral throttle and focus on smooth transitions so you have a settled car on the far left at the entrance to 8a. A quick lift or tap of the brakes will set the front end for turn in and allow you to get back on the throttle in a big way. The exit of 8a is blind, so start slow until you find the right line and work your way up to WOT through the apex. One thing to note is that, like many areas at Infineon, there is not a lot of run-off here. I’ve seen plenty of cars test the tire wall in this part of the track. It’s very difficult to pass or be passed in the esses, so take your time and be precise.


Turn 9
With a good entrance at 8a, you’ll be WOT all the way to the entrance of 10. Some people prefer to hold the inside line all the way around. My preference is to allow the car to drift out a little so I can carry a little more speed and line up for a nice straight brake zone at the entrance to 10. This is the 3rd area where you’ll be slowing from over 110 mph and it leads to the 4th so it’s very important to enter 9 properly and set up for 10. Another reason to set up properly for 10 is the very limited runoff on either side of the track.


Turn 10
Lined up with the entry burm on the left, you’ll drop 25 to 30 mph with smooth, firm braking and set the tires for turn in. Look for a late apex and get back on the throttle early; you should be WOT as you pass the apex. Getting on the throttle early will also settle the back end of the car and keep you from soiling your seat as you slide toward a very intimidating wall. This is one of my favorite turns because so many other drivers are intimidated by it. My trick is to focus down the straight to the entrance of 11 and let my eyes pull the car in the right direction.


Turn 11
Turn 11 ends the last of the ~110 mph straights and is the hardest braking zone on the track. You’ll drop about 75 mph here. This is a hairpin turn with a wall separating the track from the pits. It’s a classic slow-in-fast-out turn that leads to the front straight. Sacrificing a little entry speed will carry big dividends at the end of the straight. Enter with the car lined up on the left side of the track and brake hard in a straight line; downshift, and set the car up for a late apex. As long as the track is dry you can apex over the paint on the inside of the turn. Ease on to the throttle as you pass the apex and unwind to exit close to the wall on the left side of the track. From here you’ll be wide open through turn 12 and the entrance to turn 1.


Turn 12
This is really part of the front straight so there’s not much to say about it. Enter from mid-track and follow a natural line as you aim for the start/finish line.

Thursday, April 3, 2008

Sears next week...

And I don’t have a clue on how to drive it, so no track notes. I’ve only been once and the weather kept me off the track until the race start, so my first hot lap on the course was a race lap and so I got slaughtered. Just to add some spice it was our first (and last) standing start, and I drew the pole. On the plus side I do still have some video, and I did have some fun with Thorpe. It was a couple of years ago, in fact Thorpe’s car was delivered just in time for that weekend. Blue seems to be a fast color, wish I knew back when…


Another plus, Dennis Golden is going to give me some advice, and while he is wicked fast everywhere, Sears is his home track, so that can’t hurt.